Thursday, October 27, 2016

Pepper Murukku

Happy Deepavali dear foodies!
 

 This year I couldn’t spare enough time to make a huge batch of goodies. So I took the easy way out with my pepper murukku trial.


I pinned this recipe from Subbu’s Kitchen earlier this month. It was a quick and staright forward recipe. But unfortunately when I set of to try it, I got the wrong brand of rice flour. I was so confidant and double the recipe and started making these murukku. I couldn’t belive myself when the first batch  of murukku frying in the hot hot oil went KABOOM. Oil splattered all over my kitchen, thankfully I was standing away from the stove. Otherwise I would have had severe burns. I realised my mistake only the next morning.


I got the correct rice flour the next day and tried it out. The murukkus turned out perfect. Nice and crispy and spicy. Try out this quick murukku recipe with a spicy twist for this deepavali.

Pepper Murukku:
Ingredients:
Rice flour - 2 Cups
Besan  flour (Kadalai maavu) - 3/4 Cup
Asafoetida - 1/4 Teaspoon
Salt  to taste
Coarse pepper powder – 1 tablespoon
Cumin seeds   1 teaspoon
Butter - 3 Tablespoon
Oil – For frying

Directions:
  • In a bowl. Add rice flour, besan flour, asafoetida, salt, freshly coarsely ground pepper powder, cumin seeds, butter and mix everything well
  • Add water little by little and knead the flours to smooth and soft dough.
  • Take star mould and press. Fill the press with the murukku dough press.
  • Heat oil in pan. If you drop a pinch of dough in oil it should rise up immediately in the oil. Hold the press and mould on top of the oil and gently squeeze the dough. Deep fry the pepper murukku till they are crispy and golden brown color.
  • Take out the crispy murukku in a paper towel to drain any excess oil. Pepper murkku is now ready to serve!
Mix together - Rice flour,besan flour, pepper, asafotedia, salt and butter

Using star shape mould for the murukku press.

Crispy fried pepper murukku, Let it cool and break into small pieces.

Beetroot and Coconut Burfi


I have been putting off making my deepavali snacks for such a long time. After some motivation from some work colleagues, I started to search for some easy recipes to make. I saw this recipe from the blog Yummy Tummy and feel in love with it. The deep and rich colors of beetroots were so enticing that I couldn’t wait to start making these bite sized gems.

The burfi was quick and easy to make, and my colleagues enjoyed it!


Beetroot and Coconut Burfi
Yeilds: 36 bite size pieces

Ingredients:

Beetroot- 2 cup grated
Coconut - 2 cup grated
Sugar - 2 ¾  cup (reduce according to taste preference)
Ghee - 1/2 cup
Cashews - 4 tablespoons
Cardamom essence – few drops

Method:

  • Grease a square tray or a flat plate, and set aside.
  • Heat ghee in a pan, add in nuts and fry till golden.
  • Add the beetroot and coconut to the pan. Stir fry for 5 mins till raw smell leaves from the beets.
  • Now add the sugar and keep mixing, the sugar will melt and the mixture will get thick. Keep stirring.
  • Once the mixture starts to leave the sides of the pan, add in cardamom essence and mix well.
  • Spoon the mixture in a greased tray and spread evenly.
  • Let it cool down and set. Then cut it into squares.
Using a grater to grate the beetroots.

Frying the grated beetroot and grated coconut in ghee.

Adding in the sugar.

The mixture becomes watery after adding the sugar, keep stirring.

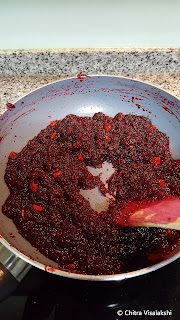
Keep stirring until the mixture becomes thick and ghee oozes out.

Spread the mixture evenly in a greased tray. And let it cool down.

Cut into bite sized pieces.


Monday, August 15, 2016

Wholewheat Blueberry Scones

Blueberries are one of my favourite fruits to bake with. Adding these juicy blueberries put these homemade scones over the top! They’re super moist and tender in every bite. They also make a great breakfast option.
Recipe adapted from https://daisyandthefox.wordpress.com
Flatten the dough into a circle.
Cut into 8 wedges.
Brush the top with cream and sprinkle with sugar and cinnamon.

Wholewheat Blueberry Scones
Yeilds: 8 wedges of scones

Ingredients:
Wholewheat flour – 2 cups (I used Ashirwad Atta)
Sugar – ¾ cup (I used raw sugar. You can use normal white sugar and reduce to ½ cup if using white sugar)
Baking Powder – 1 tablespoon
Grated lemon zest – 1 tablespoon
Salt – ½ teaspoon
Butter – ½ cup (cold and cut into cubes)
Egg – 1
Heavy cream (cold) – ½ cup (I used Paul’s thickened cream)
Fresh blueberries – 1 cup
A few table spoons of additional heavy cream to brush the tops
Raw sugar -1/4 cup for sprinkling on top
Cinnamon powder ½ teaspoon for sprinkling on top

Directions:
  • Preheat the oven to 200C.
  • In the bowl of a stand mixer, add the flour, sugar, baking powder, salt, lemon zest and the butter. Mix in the stand mixer until fine crumbs form.
  • Add the egg and heavy cream to the bowl, and mix until a thick dough forms.
  • Remove the bowl from the mixer, and gently fold in the blueberries into the dough.
  • Transfer the dough to a floured surface and press into a flat circle with about 1 inch in thickness.
  • Cut the dough into 8 wedges and brush the top with some heavy cream.
  • Combine the raw sugar and cinnamon powder and sprinkle on top.
  • Place the wedges on a baking tray lined with baking paper, and bake for 18 – 20 minutes, until golden brown.
  • Store in an air-tight container after the scones have completely cooled down.
Note:
  •  When storing, wrap each scone individually with butter paper/baking paper and store in an air-tight container. Otherwise they stick to each other and crumble.
  • Keep refrigerated. Warm in the microwave for a few seconds before consuming. Keeps well for 4-5 days.

Pumpkin Cake

So finally I decided to venture into pumpkin recipes. I baked this cake early on a Monday morning, for a pumpkin loving friend. I added loads of chocolate chips on top to make it extra special. I had taken the cake to my friend’s place for lunch. After our lunch, before I had reached home, my friends have started to ping me with messages, asking for the pumpkin cake recipe. So this recipe was a definite hit.


Pumpkin Cake:
Yeilds: One 9x9 square cake
Recipe adapted from Yammies Noshery.com

Ingerdients:
1 ½ cups -  pumpkin puree (I used canned pumpkin puree)
2 eggs + 1 egg white
3/4 cup - vegetable oil
1 ½  teaspoon vanilla
1 ¼  cups - sugar
1 ½ cups – plain flour
1/2  teaspoon – salt
1 teaspoon -  baking soda
3/4 teaspoon - baking powder
3/4 teaspoon ground cinnamon
1/4 teaspoon ground nutmeg
¼ cup – chocolate chips
¼ cup – chopped walnuts

Directions:
  • Preheat oven to 180ºC.
  • Line the bottom of a 9"x9" square pan, and grease the sides.
  • In a bowl, add sugar and oil, mix well. Combine the pumpkin puree, eggs, oil, and vanilla. Mix well.
  • Combine the flour, salt, baking soda, baking powder, and spices. Add to the wet ingredients and mix just until combined.
  • Pour into the greased pan, sprinkle the chocolate chips and chopped walnuts on top.
  • Bake for about 30 minutes or until a toothpick comes out clean. Allow to cool before removing from pan.


Thursday, April 7, 2016

Chocolate Cashew Butter

This recipe couldn't be any more easier or more delicious! And chocolate makes everything better. This homemade chocolate cashew butter is a great alternative to the store bought chocolate spreads full of corn syrup. The key to the smoothest and tastiest butter is to use good quality fresh cashew and cocoa. So start blending!


Chocolate Cashew Butter
Yeilds: 1 1/2 cups of butter

Ingredients:
  • 2 cups - Raw cashew nuts
  • 3 tablespoons - Cocoa Powder (add according to taste)
  • 3 tablespoons - Extra virgin coconut oil
  • 3-4 tablespoons - sugar (add according to taste)

Method:
  • In a food processor, grind the cashew nuts to a powder.
  • Add in the rest of the ingredients and grind to a smooth paste.
  • The food processor over heats, so stop periodically and scrape the sides.
  • Transfer to a dry container and keep refrigerated

Note:
  • The butter can be stored up to a month in the fridge.
  • It can be used as bread spread, to top your favourite ice cream, blend it in with a bowl of oatmeal, or enjoy as a dip for fruit slices.   


Wednesday, March 30, 2016

Nutella Mousse

Yields – 8 small dessert cups

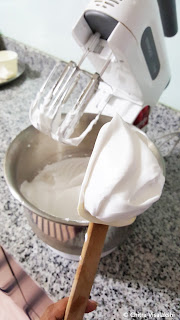
Cream whipped to a stiff peak.
Folding in the Nutella with the whipped cream.

Ingredients:
Nutella – ¾ cup
Heavy whipping cream – 1 Cup

Method:
  • Take the whipping cream in a chilled bowl of a stand mixer. Whip until stiff peaks are formed. Do not over beat.
  • Heat the Nutella in the microwave for 30 seconds. Keep stirring in 15 sec intervals.
  • Gently fold in the melted Nutella with the whipped cream.
  • Spoon the mousse into dessert cups. (I used a pipping bag to pipe the Nutella into tall dessert cups)
  • Cover and chill in the refrigerator for an hour.
  • Serve cold, topped with almond flakes, chocolate chips or chocolate sprinkles.

 Note:
  • I used non-dairy whipping cream, and it did not need any extra sugar.
  • The quantity of Nutella can be increased as per taste.
  • The mousse can be stored in the refrigerator for up to a week.